
To install an automatic slack adjuster, first secure the vehicle and then mount the adjuster onto the brake assembly. Align the adjuster with the S-cam, connect the control arm, and adjust as needed for proper operation.
Ensuring your vehicle’s brakes function optimally is crucial for safety and performance. The automatic slack adjuster plays a vital role in maintaining the correct tension on your brake shoes, allowing for effective braking. Proper installation of this component is key to avoiding brake failure and ensuring compliance with regulations.
Technicians and vehicle owners alike need a straightforward guide to fitting an automatic slack adjuster. This process typically includes preparation, setting the correct clearances, and performing final adjustments and checks. Always consult the manufacturer’s guidelines and utilize the correct tools to achieve the best results. Regular maintenance checks after installation can help preserve the automatic slack adjuster’s functionality and extend the life of your braking system.
Understanding Automatic Slack Adjusters
Automatic Slack Adjusters play a crucial role in the safety and performance of heavy vehicles. These devices ensure that brake adjustments happen automatically. This keeps the brakes working well without manual intervention. Let’s dive into what they do and the different types available.
Function Of Automatic Slack Adjusters
The main job of an Automatic Slack Adjuster is to maintain the right distance between the brake drum and lining. As brake pads wear down, the adjuster compensates for the gap, ensuring a short stopping distance. This function is vital for consistent brake performance and vehicle safety.
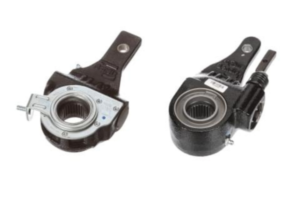
Types Of Automatic Slack Adjusters
- Stroke-Sensing Adjusters: Measure the brake stroke length to ensure it’s within specs.
- Load-Sensing Adjusters: Adjust the brakes based on the load the vehicle is carrying.
- Temperature-Compensating Adjusters: Adjust for changes because of temperature fluctuations.
Different vehicles might require different types of adjusters. Choose the one that fits a specific vehicle’s needs.
Tools And Equipment Required
Embarking on the installation of an automatic slack adjuster is a process that demands precision. Equip yourself with the right tools and safety equipment before you begin. Correct gear ensures efficiency and prevents mishaps. In this segment, we detail the essentials needed for a successful installation.
List Of Tools
Preparing the proper tools is the first step to installing an automatic slack adjuster. The following is a comprehensive list of what you’ll need:
- Socket set with a ratchet
- Combination wrenches
- Slack adjuster tool or wrench
- Torque wrench
- Allen keys or hex keys
- Pry bar or adjustable spanner
- Hammer
- Grease gun
- Measurement tape or ruler
- Wire brush
- Anti-seize lubricant
Safety Equipment
Your safety is pivotal—never compromise. Ensure you have the following safety gear before starting:
- Protective gloves
- Safety glasses or goggles
- Steel-toed boots
- Ear protection
- Dust mask or respirator
- High-visibility vest
Pre-installation Checks
Before diving into the process of installing an automatic slack adjuster, careful preparation is crucial. It will save time and ensure safety. Here, detailed steps guide you through the initial checks.
Inspecting The Existing Slack Adjuster
Start by examining the current slack adjuster. Look for signs of damage like cracks or excessive wear. Make sure it operates smoothly. The adjuster should pivot without resistance. Pull it by hand to gauge its movement. Note any irregularities and replace the component if it fails the manual test.
Checking The Brake System
The brake system’s overall condition is pivotal for your safety. Check the brake shoes for wear. Measure their thickness. Ensure they meet the minimum requirements. Review the drums for scoring or heat cracks. Here is what needs attention:
- Brake Shoes: Should display no cracks and have even wear.
- Drums: Must be free of damage, with no deep grooves or blue spots.
- Air Chambers: Check for leaks and ensure the push rod extends smoothly.
- Foundation Brake: Must operate freely without binding or sticking.
Check the air pressure system too: Look for leaks and make sure the compressor builds up the correct pressure. It should maintain it without excessive cycling. If everything checks out, you’re ready to install.
Removing The Old Slack Adjuster
Before installing a new automatic slack adjuster, the old one must come off. This task requires careful steps to ensure safety and accuracy. One mistake could lead to brake malfunction. The process involves releasing the brake chamber’s tension and removing pins and hardware. Buckle up for a straightforward guide to remove the old slack adjuster.
Releasing Tension On The Brake Chamber
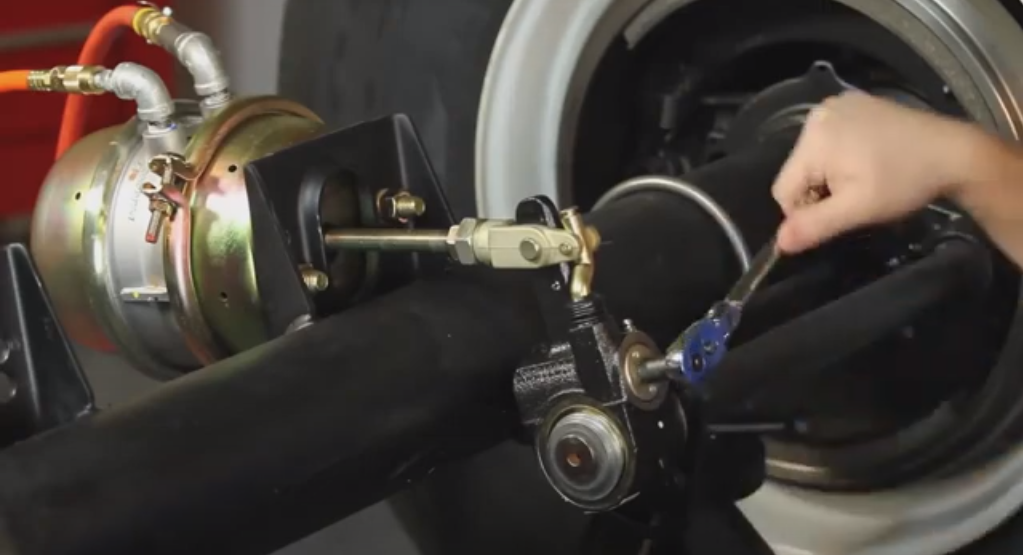
Begin with chocking the wheels. It stops the vehicle from rolling. Next, locate the brake chamber and use a wrench to turn the pushrod. Turn it in a way that eases the tension. Remember to wear safety gloves. Keep your face away from the brake chamber. Springs under tension can release suddenly.
Removing Clevis Pins And Retaining Hardware
Focus on disconnecting the slack adjuster from the brake chamber. Look for the clevis pin at the end of the pushrod. Remove the cotter pin or retaining clip first. Use pliers for an easy pull. Slide out the clevis pin afterward. Keep all small parts together. You’ll need them when installing the new adjuster.
- Block wheels securely
- Wear safety gear
- Find the pushrod
- Reduce spring tension
- Remove retaining clips carefully
- Slide out the clevis pin
With these parts removed, you can slide the old slack adjuster off. Inspect the spline for damage. Clean it before setting up a new adjuster. This attention to detail ensures a smooth installation and optimal brake function.

Installing The New Automatic Slack Adjuster
Keeping commercial vehicles in top shape is vital for safety and efficiency. A key component in the braking system is the automatic slack adjuster. Let’s tackle installing the new automatic slack adjuster. This crucial step ensures brakes remain responsive and effective. We’ll walk through the installation process with easy-to-follow instructions. Your vehicle will be back on the road, ready for action.
Attaching The New Slack Adjuster
Start with the right equipment. Gather all necessary tools. Ensuring you have the correct model for your vehicle is crucial. Different slack adjusters fit different makes and models.
- Remove the old slack adjuster.
- Clean the spline on the camshaft; it should be free of debris.
- Apply a thin layer of lubricant to the spline.
- Align the new slack adjuster with the spline.
- Fit the slack adjuster onto the camshaft spline.
Secure the slack adjuster with the retaining hardware. Tighten it as specified by the manufacturer.
Check for correct installation. Ensure the slack adjuster fits snugly and moves appropriately.
Proper Adjustment Of Pushrod Length
Accurate pushrod adjustment is essential. It ensures the brakes apply correctly.
- Consult the manufacturer’s specifications for correct pushrod length.
- Use a ruler or measuring tape to check the pushrod length.
- Adjust the pushrod as needed by turning the adjustment bolt.
- Ensure the pushrod length matches the spec after adjustment.
Double-check your work. Re-measure to confirm the length is correct. Brake performance relies on precision.
Operate the brake system to verify correct automatic adjustment. Confirm that the adjuster maintains the proper distance as the brakes wear. Regularly inspect and test to ensure ongoing effectiveness.
Performing Function Test
Ensuring that an automatic slack adjuster functions correctly is vital for the safety and efficiency of your vehicle’s braking system. A thorough function test after installation confirms that the adjuster operates as intended. Let’s walk through how to perform these critical function tests.
Testing The Automatic Adjustment Function
Begin by lifting the vehicle to allow the wheels to rotate freely. You’ll need a properly secured jack and safety stands. Once secure, rotate the wheel by hand. You’re checking for free movement and listening for any unusual noises.
With the engine off, apply the service brake pedal several times. The push rod should move out and retract smoothly. A correctly adjusted slack adjuster won’t allow the push rod to over-extend.
Verifying Brake Operation
Next, start the engine to build air pressure in the system. Watch the air pressure gauge until it reaches the operational range. Apply the brakes firmly, then ease off. This sequence should be repeated several times. Reflect on what you feel. The brake application should feel consistent, without any sponginess or delay.
For a complete check, get a friend to observe the brake mechanism while you operate the brakes. They should see the slack adjuster arm maintaining a steady hold without slipping or erratic movement.
Contact your local professional if the test findings seem off. Proper brake function is not just a convenience; it’s a necessity. A well-adjusted brake system keeps you and other road users safe.
Troubleshooting
After installing an automatic slack adjuster, thorough troubleshooting is necessary. Identifying common issues immediately can save time. Accurate adjustment ensures the longevity and efficiency of the slack adjuster. Let’s dive into solving common hiccups encountered during the installation process.
Common Installation Issues
Spotting and fixing installation problems is critical for a smooth operation.
- Incorrect Slack Adjuster Model: Match the slack adjuster to your vehicle’s specifications.
- Improper Mounting: Check the installation angle. It should be correct as per the manufacturer’s guide.
- Insufficient Lubrication: Lubricate pivot points to ensure smooth movement.
- Wrong Clearance: Adjust the brake clearance as specified for your vehicle’s brakes.
Adjustment And Correction
Correcting the adjustments is as important as the initial installation. Follow these steps for precision.
- Verify Installation: Double-check the installation against the manual provided.
- Adjust Brake Clearance: Turn the adjustment bolt until desired clearance is achieved.
- Check Automatic Adjustment: Apply and release the brakes to ensure the adjuster sets itself correctly.
- Monitor Performance: Test the vehicle to confirm the adjuster maintains proper clearance over time.
Making these corrections promptly can prevent larger issues down the road.
Maintenance And Inspection
Keeping your automatic slack adjuster in top condition is crucial for the safety and efficiency of your vehicle. Regular maintenance and inspection ensure that the adjuster performs as it should. Neglect can lead to poor brake performance or even failure. Let’s dive into the best practices for maintaining your slack adjuster.
Routine Inspection Schedule
Regular inspections help detect issues before they become major problems. Here’s a suggested timeline:
- Weekly: Quick visual check.
- Monthly: More detailed examination.
- Bi-annually: Comprehensive review by a professional.
Maintenance Procedures
Follow these maintenance steps to ensure longevity:
- Clean the adjuster: Remove dirt and grime.
- Inspect for wear: Look at the components.
- Lubricate moving parts: Use the correct lubricant.
- Test functionality: Ensure the adjuster operates correctly.
- Adjust when necessary: Keep the adjuster finely tuned.
Always follow the manufacturer’s guidelines for the best results.
Conclusion
Mastering the installation of an automatic slack adjuster is crucial for vehicle safety and performance. By following the steps outlined, you can ensure your truck’s brakes remain in top condition. Practice makes perfect, so get started today and enjoy the confidence of well-maintained brakes on every journey.
Related Article
Read Now
Custom Solutions for Automatic Slack Adjuster Systems: Boost Safety & Efficiency
Custom Solutions for Automatic Slack Adjuster Systems enhance braking consistency...
Read More
Environmental Impact of Automatic Slack Adjusters: The Eco Truth
Automatic slack adjusters reduce brake maintenance and improve vehicle safety...
Read More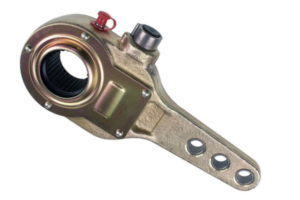
Regulatory Compliance for Automatic Slack Adjusters: Stay Safe & Legal
Automatic slack adjusters in trucks must comply with specific regulations...
Read More
Automated Braking Systems And Automatic Slack Adjuster Integration: Enhancing Safety
Automated Braking Systems (ABS) enhance vehicle control during abrupt stops....
Read More